 There are an astonishing number of different ways to preserve leaves and flowers, most of which require items I don't have handy or more time than I want to spend. It's not that I'm impatient, it's that I'd rather not wait.
Then I tripped over a most enlightening article by artist Cynthia Padilla at Garden and Hearth. "How To Preserve Autumn Leaves in Liquid Wax," she tempted ever so fetchingly. It didn't take me long to figure out this was my kind of gig, especially when part of her instruction was to begin the process by pouring yourself a mug of your favorite steamy beverage. Obviously a woman of great good sense.
The instructions are brief and simple so I won't go into detail here. Please do click over to the above link and print off a copy of the page for yourself. You'll be glad you did.
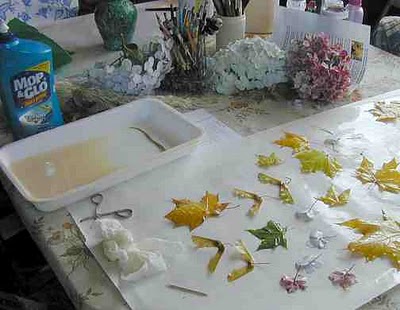
Basically, once you've gathered your leaves, you need to fix your work area. Ms. Padilla suggests sheets of waxed paper for laying out the leaves but I find one gets a sturdier and broader work area by putting down a length of butcher paper, shiny side up, and duct taping the corners to keep it flat. Because I've seen the question asked at other sites, let me explain that butcher paper is also called freezer paper and rolls can be found in cutter boxes in either the canning section or paper goods section of your supermarket.
You need a shallow container for the wax -- either a pan or deep dish you don't care about or one of those handy formed foam trays in which your meat is packed. Luckily, I had saved a couple from when I got family packs of chicken breasts. Perfect, as it turns out.
The wax. She didn't specify any particular type, beyond that it be liquid. There just happened to be a jug of good ol' Mop 'n Glo under the sink so that's what I used. It seems to work fine. You will note in the picture below, the tray seems to be raised on one end. Truth is, that's just a result of the very uneven floor up here. And the tilt turned out to be a good idea. I could dip the leaf at the deep end and efficiently tap off excess wax at the high end.
She says to iron the leaves between a couple of sheets of newspaper to flatten them a bit. I did that with some, then skipped that step with the others. The leaves are easier to handle when they have a bit of curve. Although leaving out that step saves time, I don't know if it will cause any problems down the line. We'll see.
Update: Do NOT skip the ironing step! I really didn't see that the ironing took out much moisture, if any, so didn't worry about the flattening effect. Evidently, what little moisture there is needs to be gone. The leaves I'd ironed stayed mostly flat. The ones that escaped the iron, curled up overnight and looked like a bunch of little crabs walking across the paper. More about the process in the next post.
I found it was a good idea to have a slightly damp paper towel in hand when turning the leaves to enable them to dry on each side. A quick swipe with the towel on the butcher paper cleaned any lingering drips so the leaf could be set back down on a dry space.
Those fluffy mounds just past the work area are blossoms off the hydrangea bush. I'm also experimenting with waxing the individual blossoms from the big clusters. There must be all kinds of things I could be dipping in wax. Ralph should maybe keep a low profile for awhile.
And it's that simple, Coffee Mates. Iron first, dip and dry, then dip and dry a second time and have another cuppa. While you're sipping, admire the way the wax seems to intensify the color in the leaves. Wonderful. Now we'll just have to see how long they last with the wax treatment. At least I know I won't have to buff them.
(By the way, did you know if you click on the photos, you will see a bigger version? I mention that because the detail in the waxed leaves above shows more clearly in the large size.)


3 comments:
This stirs up some really old memories. Thanks, Dee!
Where DO you find these things? And have you nothing to do but search them out? Let me know how the hydarengea spearmint turns out -- I've got several large bushes in front of the house & I could have fun with that.
I think this is just the thing for the grandkids! My back yard (& front yard too) are littered with leaves, off the silver maples, off the Chinese tallow trees, off every tree in the neighborhood. Yep, we could have fun with this! Thanks!
What a surprise, Mop and Glo of all things! I was thinking the old kind of parrafin.
Be interested to see how the flowers do. At least they shouldn't drop little blue things all over the tablecloth.
btw if you sent out notice Thursday I didn't get it. :-)
Post a Comment