Showing posts with label breads. Show all posts

Wednesday, October 21, 2009

How to Do Clark Gable

I don't know what it is. I think you have to have been born somewhere south of the Mason-Dixon line to eat pecan pie with impunity. I do love it, you understand. Really. It's just that it's so utterly, irredeemably, impossibly rich. I can't think of another thing, right off the top of my pointy head, that contains such intense, concentrated sweetness. And I don't handle that degree of sweetness well.

My tummy is such a wuss. This is the same tummy that thrives on any chili pepper that makes it past my taste buds and begs for more. But offer it something really, really sweet and it throws up its little hands and whimpers, "Don't hurt me." It's just pitiful. That's why, much to my dismay, I have to limit myself to a small portion of pecan pie once in a very great while.

Until today. Today I may have stumbled on the perfect solution, allowing me to have my pecan pie and eat it , too, just as if I owned real estate on Bourbon Street and had a season pass to Dollywood. There I was, browsing around the Tasty Kitchen section at the Pioneer Woman site and I found this deceptively simple recipe for Pecan Pie muffins. Muffins! Who'd a thunk it?

I urge you to click over there and look around but, for future reference, here's a quick take on the recipe. First, you set your oven at 350 degrees fairy height. Then you whisk together 1 cup of chopped pecans, 1 cup packed brown sugar and 1/2 cup of all purpose flour. Melt 1/2 cup (1 stick) butter. Lightly beat two eggs and add them to the butter. Stir the liquid mixture into the dry mixture. Add 1 teaspoon vanilla flavoring. Fill six muffin cups and bake 20 to 25 minutes. (I did the full 25.) Remove from pan immediately.

EDIT: I forgot to say (because this particular recipe source didn't mention it) but be sure to grease your muffin cups! Your mileage may vary but, personally, if I suspect a potential for serious "sticky," I use solid shortening instead of nonstick spray. If you wait too long to decant the muffins, just pop them back in the oven for a couple of minutes and they should drop out easily. As for using paper liners, I'd suggest not. From what I've read, most folks feel too much of that nice, crunchy crust gets lost when you peel the liners away.


Well, folks, I had a batch of those bad boys whupped up almost before you could shout, "Memphis, Mobile and Baton Rouge!" That's assuming, of course, that you'd even want to wander around your kitchen shouting the names of southern towns like you were practicing to be a train conductor.  It's just that they have such a great magnolia-scented sound to them, don't they?

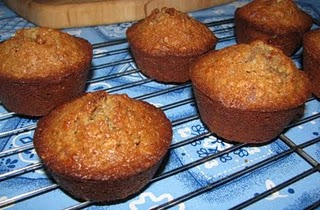
As you can see, the recipe makes a tidy half-dozen muffins, which is just fine for me. Just the perfect size for one to give me a great pecan pie hit without making my tummy snivel and whine. In fact, my tummy insisted I give it a second muffin before it very politely said, "Thank you, that will be sufficient."


Just look at that tender, moist interior, will you? (If you left-click on the photo, you'll get a larger version to view.) I promise you, there is absolutely nothing you need to put on these muffins to enhance them. Nothing. The crispy-crunchie outside and the soft, caramel-like inside are perfect just as they are. Perfect, I tell you. And if anyone around you complains that you're getting the lion's share of the muffins, you'll feel southern enough by then to do a Clark Gable and say, "Frankly, my dear, I don't give a damn."
Friday, October 16, 2009

Ohboyohboyohwowie!

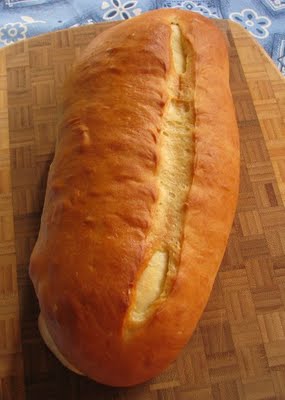
Are you smelling the incredibobble fragrance of that gorgeous bread? Is your mouth watering copiously? Are your taste buds quivering with excited anticipation? Yeah. Me, too. I can't take credit for this lusty loaf of leavened heaven. Should you happen to wander over to the "Tasty Kitchen" section of Ree Drummond's "Pioneer Woman Cooks" website (see Ree's link in sidebar) and should you happen to cruise through the section on breads, you would soon come to this outrageously good recipe for Fast Bread. That is not the same thing as "quick bread," you understand. We're talking about a fast and easy yeast bread that comes out totally tender-tasty and loaded with the prized Wowie! factor.

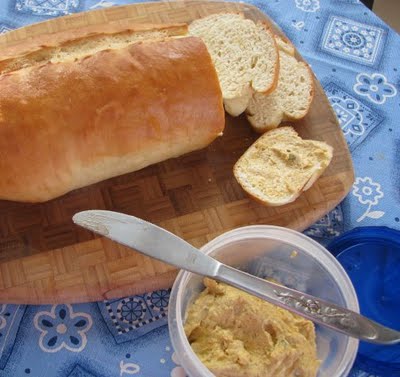
While I was waiting for the bread to rise and bake (not very long), I whupped up my own version of a basic cheese spread. I say "basic" because you can go just about anywhere you want from the bare bones, adding or subtracting seasonings of choice, perhaps adding different cheeses like Parmesan and/or crumbled feta and/or bleu cheese and maybe even a generous helping of tiny canned salad shrimp or whatever lights your candle. But the first thing you want to start with is the roasted garlic.

Now, Lord knows, you don't want to fire up the big oven for one little head of garlic. Or even one big head of garlic. This is the kind of thing your microwave does very well. This is sorta-kinda the way Barbara Kafka suggests doing it in her excellent Microwave Gourmet cookbook. Whack the tips off of a head of garlic, exposing the cloves. Set it on its little bottom in a 4-cup measuring cup and drizzle with about a tablespoon of olive oil. (She suggests 2 tablespoons if you're roasting 4 heads.) Then you add about 2 ounces of chicken broth (I mixed a bit of chicken bouillon with hot water), cover with plastic wrap and nuke for 5 minutes. Let stand for about 10 minutes still covered, then cool and pop the tender, nutty-sweet cloves out of their skins. You will not believe how great your kitchen will smell while this is going on but you will probably find yourself suddenly doing a lot of deep inhaling.

Okay, that's the first part. Now comes the fun stuff -- and I apologize for forgetting to take a picture of this bit but I was undergoing creative chaos and the thought of clicking a shutter couldn't squeeze its way though the crowd.

Drop those cloves into your blender or the mini-bowl of the food processor and add about a cup of finely grated cheddar cheese, a scant tablespoon of softened butter, a bulging tablespoon of stone ground mustard (mine is blended with stout) and maybe a couple tablespoons of white wine. I have some lovely Gewurztraminer that was perfect for the job. At the last minute I tossed in about 2 tablespoons of canned, sliced jalapenos (you can use pickled or plain) and processed it until I had a creamy spread and the peppers were minced up tiny.


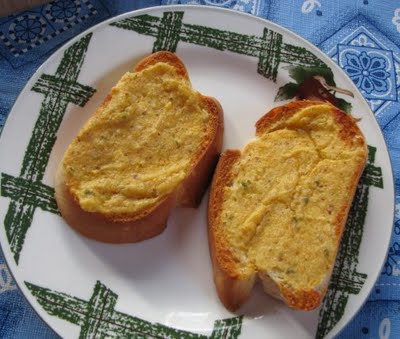
You'll end up with about cup of spreadable goodness that you can smear on bread or crackers. Or you can plop a glob onto the top of a hot baked potato or steamed veggies. It'll taste better the next day, after the flavors have melded a bit in the refrigerator but you don't need to wait that long for the first taste. As you can see from the above photo, I didn't. And while I was savoring that, I slathered some more on the other two slices of bread and slid them under the broiler.

This is how they looked in the time between the depths of the oven and the depths of my mouth. I wish you could smell the aroma arising therefrom. Heaven.

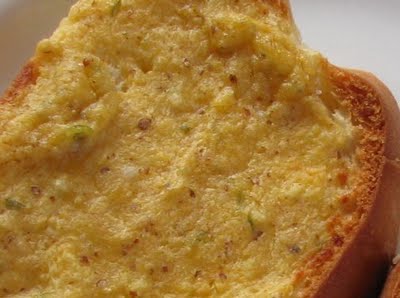
Okay. This needs a closeup. Just feast your eyes on those teensy bits of garlic and jalapeno and whatever those flecks from the mustard might be. Yes, I know. It's a thing of grace and beauty, is it not? Ohboyohboyohwowie! I'm just sayin'. . .

Monday, July 13, 2009

Fat Round Things


Yes, I am a little tired. Why do you ask?

Boy howdy, I do believe this child is going to sleep well tonight, that's what. It's been a really busy day, including a hike up to the market so I could pick up some more butter and replenish my cheddar cheese supply. It wasn't until I got back that I realized I'd forgotten the treat I'd promised myself. After a week of overcast and occasional drizzle, today turned out so gorgeous I was going to sit at the little picnic table beside the market and indulge myself in a decadent ice cream cone -- a waffle cone, to be specific. Dayum.

Ah well. Something to look forward to on another sunny day, I guess. Besides, my culinary project for the day turned out rather well so I can't really complain. Okay, I can really complain but my heart isn't in it.

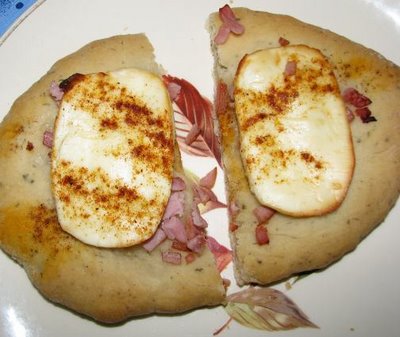
See those fat round things just below this paragraph? Those are sorta kinda mini-foccacias. Or should that be "focaccia?" Because I keep finding it spelled both ways. [Pause for Google search.] Okay, according to Merriam-Webster, it's focaccia. Fo-caw-che-ah. Of course. I knew that. I just forgot I knew it.

Anyhoo, what I did was whomp up a batch of pizza dough and seasoned it with good stuff like cumin and oregano and lemon dill. Then, after it did its rise gig, I divided it up into 8 balls and patted them out into more or less round shapes. Some of them were of the free-form persuasion but I didn't see any reason to discourage their individuality so I let 'em hang it all out. Not owning a dandy gadget like a dough docker, I forked the daylights out of them so they wouldn't rise up too terribly much in the middle. That's because they're slated to serve as fatso pizzas when I'm in the mood for a fatso pizza. I could have rolled them out really thin. Some folks like a thin, crispy crust. I happen to like a fat, chewy crust that lends itself to dipping in whatever looks tasty.

I cooked them at 375 degrees fairyheight for 10 minutes, then brushed them with olive oil when they came out of the oven. When they have completely cooled, I'll slip them in Ziploc bags and toss them in the freezer. Then, when I'm in the mood for a quick and tasty meal, I'll pull one out, top it with whatever happens to be handy and slide it into a 400 degree oven for another 10 or 15 minutes. Shazaam!

For those of you who counted the mini-focaccias on the platter and came up short a deuce, I can assure you there really were 8 of them a little while ago. The thing is, by the time they were all baked, I was so outrageously hungry I could have eaten a horse and chased the rider with a fork. I had planned to make a nice little batch of garlicky white sauce for a pizza base but my tummy didn't even want to wait for that. I just minced up some ham, slapped on a couple of slices of mozzerella and cooked those bad boys before I fainted. The one you see below is now residing in my pacified tummy. The other one is waiting for my midnight snack urge, should it happen to rear its head tonight. If I end up impersonating my feline friend above, then I can count on having a tasty breakfast. Sounds like a win-win to me.

Saturday, November 8, 2008

Kudos & Tin Can Bread

Wow! You Coffee Mates just blow me away! Look at all those comments for the last post. Now -- look at the big grin on the front of my face. Yeah. Y'all did that -- and I wish I could hug every one of you. I'm going to print off the whole comment section and save it, by golly. And, by the way, Bill (Old Guy), if I haven't mentioned it before, you are a punster par excellence. And I do love puns.

And I guess everyone loves show biz. Bonnie said she wanted a picture of the show. You meant the Wives Club show, right? Well, I think I still have a couple of snapshots laying around but I'll be darned if I know where.

Jo, you asked what part I played. Actually, several of us played more than one skit -- or act, or whatever -- because we had a limited talent pool. In one skit, I was a liddle ol' lady getting tipsy at the bar, in another, I was one of the goofy Newfie paperhangers, where we did a sort of Three Stooges routine with ladders and buckets of flour and water paste. Wherein I managed to splash some of the paste on the Wing Commander's wife's lovely blue dress because she was sitting dangerously close to the stage. Fortunately, she was totally gracious about it. (sigh) My favorite skit, though, was my stand-up comedy bit. With the help of a spare "body" of foam rubber and duct tape, I became Fat Aunt Fanny -- sort of a Phyllis Diller with heft. Wore an orange flowered mumu, high top tennis shoes and wore the most godawful wig you ever saw. It was total fun.

Now -- as a thank you for all the great comments, I'm going to share my neat new sandwich with you. Although God took pity on me yesterday and broke our run of rotten weather by letting the sun shine on my birthday (thank you, God), today we were back to rain squalls and wind flurries -- in short, business as usual. It didn't take much gazing out the window to have me yearning for a nice hot toasted cheese sandwich, that's what. Only problem was, I had so much fun with family yesterday, I forgot to make any bread. But that's okay -- as it turns out, I found a flavor suggestion that sounded good and this is how it went ...

TIN CAN SANDWICH BREAD

In your bread machine:
1 cup warm water
1 tablespoon olive oil
1 egg, slightly beaten
salt to taste
1/4 cup finely minced sun-dried tomato
1/3 cup finely grated Parmesan cheese
1 cup whole wheat flour
2 cups all purpose flour
1 package (or 1 tablespoon) yeast

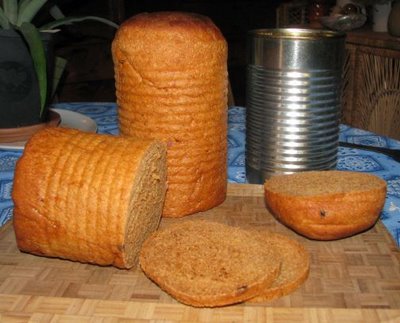
Put the machine on the dough cycle and let it do its thing. In the meantime, dig out those two tall tomato juice cans you saved. (Okay, you may want to save a couple of juice cans for future use. I just happened to have these two on hand -- for exactly this kind of project.) Give the cans a good spritz with your nonstick spray and when the dough is ready, divide it into two equal parts and plop them into the cans. Spritz the tops of the dough, cover the cans, let rise for about an hour. (If you want to make the bread in a regular bread pan, this recipe makes one standard loaf.)

I didn't want to put the cans on the lowest rack because I was afraid the bottoms of the bread would burn. On the other hand, being the cans were tall, I was afraid the tops might scorch as the loaves baked. So what I did was, I put the bread in a cold oven, set it at 400 degrees and turned it on. After 15 minutes, I turned the heat down to 350 degrees and baked the bread for another 15 minutes. They came out perfectly! Whew.


If you happen to get the juice cans that are banded with ridges, you will notice that gives the baked bread handy built-in cutting guides. Shooweet! What I like about doing the tin can bread is that you get a great size for snacking sandwiches -- as opposed to full-meal sandwiches. The can slice is only slightly smaller than regular sandwich bread.

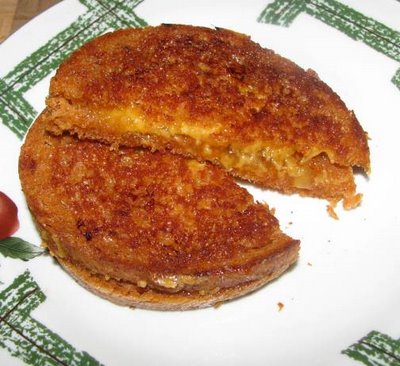
Now, here's the kicker ... at a site called The CookMobile, a suggested variation on the classic grilled cheese sandwich called for a layer of blackberry preserves, a layer of chopped onion, some chopped nuts and a slice of cheese. One is encouraged to try other jam flavors, too. And I just happen to have some orange marmalade that was jumping up and down and yelling, "Me! Use me!"

So I sliced me a couple of slices of the bread and buttered one side of each slice. Spread a light layer of marmalade on the unbuttered side of one slice, stacked on some of the shredded cheese left over from my cheese puffs the other day -- and cooked the sandwich to a lovely golden brown. And went "Nom, nom, nom!" with every delicious bite. Yes, it was great.

But now I'm really slapping myself. Did you notice what I forgot? Yeah. No onions. No nuts. Dayum! Ah well. I have plenty of bread left. I can do the other goodies with the next sandwich.

Thursday, August 14, 2008

Hot Pretzels, Cold Beer

Boy, I had such a picture for y'all tonight. Caught some of the Cedar Waxwings hangin' a bit in the birch trees outside the window. "Hooboy!" I yelled as I grabbed the camera and tore around the table to score the "money shot." (That's intrepid photographer lingo.)

I barely had time to focus on one of the waxwings who seemed almost bright yellow in the sunshine. Then, before I could try for another shot, they all flew away to another destination. No problem, I thought to myself. At least I got the one feller and the light was really good.

So when I uploaded the pictures to the computer, the first one out of the chute was the waxwing photo. Almost drooling with anticipation, I zoomed in on the yellow spot in the branches of the tree. And I blinked. And I backed out of the zoom and looked frantically around the picture. Leaves. Nothing but leaves. All of them green -- except the single yellow one which, in my haste, I had taken to be my feathered target.

It was a nice leaf photo, though. As leaf photos go. (insert sigh)

There was somewhat more success with a cooking adventure today. I have no idea how I happened to decide it might be fun to make some soft pretzels but after browsing twenty-eleven recipes, I had to give it a shot. I chose the recipe I found at Sugarlaws, mainly because it produced a small batch -- plenty enough for experimental porpoises. (Those porpoises will get greedy if you let 'em.)

You will need to go to Katy's site if you want to see the original recipe and a couple of excellent photos of her pretzels. Because you know I'm gonna mess with the ingredients, don't you? And I did the soda water thing a bit different than she did so I could get a browner pretzel.

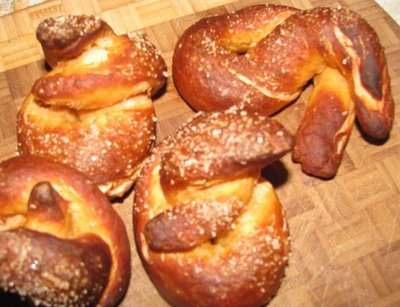
On the other hand, if you want a good chuckle, you can just look at how my pretzels turned out. In my own defense, I've never made pretzels before. Or if I did, I sure don't remember doing it. Because you'd think I'd have figured out how to make the pretzel twist stay in place. That one in the upper right corner sort of got all relaxed and crossed its legs and there wasn't a durned thang I could do about it. Except eat it, of course.


SOFT PRETZELS

2 teaspoons yeast and a pinch of sugar dissolved in
1/3 cup warm pale ale
Let it sit for about 10 minutes until it's nice and foamy.

Add 1 1/4 cups flour, 2 tablespoons sugar, 1/2 teaspoon salt and 1 tablespoon olive oil.
I also added 1 tablespoon chipotle/tomato bouillon and 1 tablespoon onion flakes.


This won't take long -- just dig in with your hand and start mooshing everything together. It may seem too dry but keep at it until the dough cleans the bowl. Trust your instinct -- add a tablespoon or two of warm water if you think you need it. Turn dough out on very lightly floured surface (if you have a silicone pastry mat, you won't need extra flour) and knead for a couple of minutes. Grease the bowl and put the dough back in. Cover and let rise for an hour or so.

Okay, now comes the fun part. First, set your oven at 425 degrees fairyheight. Divide the dough up into 6 equal parts (I only did 4.) Roll each piece into a long rope and let the strands rest while you fix the soda water. In a nonreactive kettle, mix 2 quarts of water and 5 or 6 teaspoons of baking soda. Stir until soda is dissolved and bring to a boil, then reduce heat to a simmer.

Go back to your dough strands. The dough will have relaxed a bit so you can roll it out even longer. Twist each strand into a pretzel shape -- or any old shape that you fancy. What the heck. They're your pretzels, right? Now slip 2 or 3 pretzels at a time into the simmering water and let them cook a bit. This is what gives them the "skin" so they'll turn that lovely dark brown in the oven. Here's where I found a rather wide variance from one recipe to another. Some folks only boil the pretzels for about 20 seconds, some insist on a couple of minutes. I split the difference and let them boil for 1 minute.

Lift each pretzel out of the water with a spatula or slotted spoon and lay on an oiled cookie sheet (or parchment paper or silicone baking mat). Now is a good time to grind some coarse sea salt over the dough, while it's still wet from the water bath. Slip the pretzels into the oven on the top rack (I raised the rack one setting up from the middle) or the bottoms might get too brown. Cook 8 to 10 minutes. Eat them as soon as you think you can avoid blistering your tongue. Serve with mustard, or maybe jalapeno cheese sauce, and cold beer.

Tuesday, August 5, 2008

Soup & Crackers Day

I was going to fix myself some soup and crackers today because it's a soup and crackers day. Overcast, hinting at some form of wetness and just at the south end of a comfy temperature. So, yeah, soup and crackers. Except I didn't have any crackers.

Wait. Why not (gasp!) make my own crackers?

Have I mentioned how much I love Google? It didn't take long to browse abundant cracker recipe links and find an absolute gem of a recipe, one that handily meets my F.E.D. principle. (Fast, Easy, Delicious) If you go to Orb's website, in the food section you'll see the aforementioned recipe titled Orb's Homemade Crackers. I point you there because she deserves the visit and besides, I took certain mild liberties with her recipe so you might want to make comparisons. What follows here is my version of her version, so to speak.

ORB'S HOMEMADE CRACKERS -- TWEAKED

1/2 cup grated cheese
1/2 cup flour
2 tablespoons butter
2 tablespoons water
seasoning to taste


In a small bowl mix cheese, flour and seasoning. I grated the cheese at the smallest size, the one that looks like angel hair, figuring it would blend better. I did not put salt in the mixture because I wanted to sprinkle the dough with salt before baking. What I did do was sprinkle in a light touch of cayenne pepper but you can use any seasoning you fancy -- like onion or garlic or rosemary or whatever.

After you've tossed the mixture a bit so the cheese shreds are nicely flour-coated, plop in the softened butter and the water. TWEAK WARNING: Probably cold butter and liquid would make the crackers flakier but warm is easier to mix. Your call. The crackers will be tender-crisp either way. Also, remember my pie crust the other day? The one with vodka? Yeah. I'm gonna use that stuff up one way or 'tother. My liquid of choice today was 2 tablespoons of ginger vodka. I'll bet you could use pretty much any liquid -- water, milk, beer, tomato juice -- you get the idea.

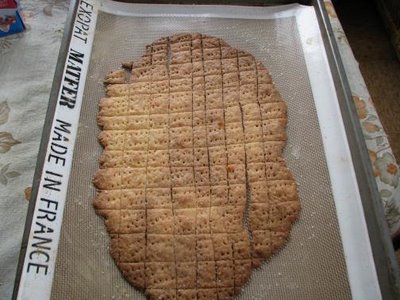
Anyway. Quickly mix the dough until it cleans the bowl and turn it out on a lightly floured surface. TWEAK WARNING: I have one of those silicone baking mats. Figuring the less flour, the better, I turned the dough out directly onto the mat and rolled it as thin as I could, using a light dusting of flour on top of the dough and on the rolling pin. I figured it would be a lot easier to handle the dough this way. If you don't have a baking mat, tear off a sheet of parchment paper to fit your cookie sheet or, if there are no raised sides on the pan, roll out the dough directly onto its lightly oiled surface.

When you've rolled the dough to your satisfaction, take a table knife or wheeled pizza cutter and lightly -- lightly -- score snap lines in the dough. I stress lightly because you don't want to cut your expensive baking mat! After you've scored (heh, heh), poke your dough with a fork -- again, gently -- to minimize puffiness during baking. Now, you could go to a lot of extra effort (and there may be times you'll want to) and patiently cut out little rounds of dough -- or whatever shape you want -- and place them individually on the cookie sheet. That's fine, too. It's just that it's a lot faster and easier to score the sheet of dough and break it up into individual crackers later. So mark your dough and then pick up the silicone baking sheet or parchment paper and lay it on a cookie sheet.

Okay. Now is the time to sprinkle whatever topping you want. I grated some coarse sea salt over the surface. You can go with various herbs or finely chopped nuts or seeds. Gently press the topping into the cracker dough by patting with your fingers. I made the mistake of trying to pass the rolling pin over it. Given that the rolling pin was wider than the cookie sheet (which had raised edges), I pressed unevenly and messed up my nice neat score lines. I'm trying to convince myself that gives the crackers a pleasant artisan look.

I baked these at 350 degrees fairy height for 15 minutes. You might want to experiment with temp and time. As you can see in the above photo, the sheet of dough did not bake evenly. What you can't see is that the darker part is just as delicious as the golden part. I think it's probably wise to keep an eye on progress after the 10-minute mark so the edges don't get too brown.

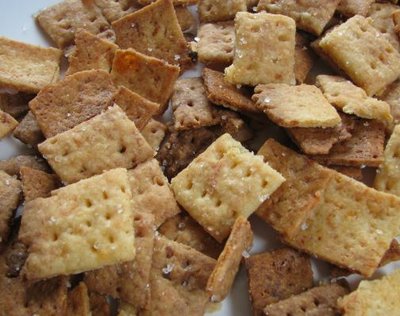
When you bring it out of the oven, let the pan set on a rack for a bit. When the crackers are cool enough to handle, snap them into individual little guys. They snap quite easily and it's fun to lick your fingers when you're done. You'll end up with somewhere between a cup and two cups of crackers, easily stored in a pint zip-type freezer bag.

I made the mistake of bringing the bag of crackers in here by the computer. And I keep nibbling. If I'm not careful, I'll be too full of crackers to have any appetite for soup. Self-discipline can be so pesky.


Saturday, May 17, 2008

Tortilla Jones

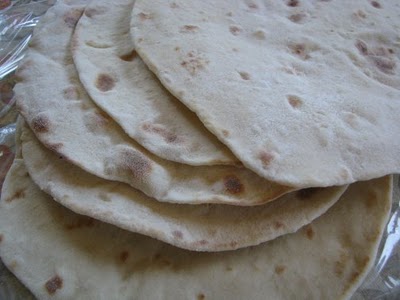
That this photo exists at all is a testimony to the power of the urge when I decide, by damn, I want some tortillas!

This was yesterday, a day that dawned sunny and by only 8:00 in the morning was already in the high seventies. Late afternoon had me flopping around and panting in eighty-plus degree heat and unwilling to expend any more energy than was required to wipe off the freshest layer of sweat. Unfortunately, if was during that latter part of the "heat wave" that my tortilla jones raised its insistent head ... and I was fresh out of the tortillas I usually buy at the store.

See, one of my favorite snacks is to throw a tortilla on the pizza pan, sprinkle it with shredded cheese and spicy seasoning, then put it in the oven until the cheese is bubbly and the tortilla starts to get crispy. Then I take it out and cut it in wedges with a pizza cutter and go "Nom, nom, nom," until I've finished the whole thing.

You can't do that if you don't have tortillas.

So I had to make some tortillas, never mind that just the effort of rolling them out made me drip like I was standing in the shower. I figured if I survived the whole silly production, I would have sweated off any calories in advance. Now that it's over, I'm sure that's true.

I shared the recipe back in July last year, the entry titled "Tortilla Sunset," but to save you the bother of looking it up, here's the quick version:

Mix together 2 cups flour, 1 1/2 teaspoons baking powder and 1 teaspoon salt. Add 3/4 cup warm milk and 2 teaspoons vegetable oil. Mix well, turn out onto floured surface and knead a couple of minutes. Cover dough and let rest 20 minutes. Divide into 8 portions, shaping into balls. Cover and let rest 10 minutes. Pat each ball out with fingers, then roll thin. Slap into dry skillet at medium heat and cook 1 to 2 minutes on each side. The torts will puff up. That's okay. Stack cooked torts on plate covered with folded kitchen towel. When cool, can be slipped in plastic bag and kept in refrigerator or frozen.

So I did all that -- with the fan turned on and aimed directly at my wilting miserable self. It was all worth it. The spicy cheese tort/pizza was sublime and my jones gland was satisfied. Not only that, later, while in the middle of a book, I slathered some butter and peanut butter on another tort, rolled it up, and snacked and read to my heart's content. Okay. My tummy's content.

Sometimes, you know, that's the same thing.