Saturday, August 29, 2009

Bugs & Windshields

The weather decided to put on a more amiable face today, which made me feel more amiable. So amiable, in fact, that I decided to try out a new cookie recipe. As I believe I've previously noted, some days you're the windshield, some days you're the bug. This was a bug day.

Mind you, the cookies are delicious. They just seem to have a serious identity problem. They don't know whether they're going to be hard-crunchy or fall-apart softy. Out of the oven, they cool down to the former -- put in an air-tight container, they sag to the latter. I was expecting something along the lines of a cake-like texture because these are apple-cranberry cookies but I suspect the brown sugar measurement is in error. If the recipe had called for half white and half brown, I'll bet there would have been a difference in the result. Not that it matters. I will still eat -- and enjoy -- the cookies. I just won't ever use that recipe again.

There was a happily serendipitous bonus out of the affair, however. Remember how I mentioned we can make our own brown sugar (1 or 2 tablespoons molasses per cup white sugar)? Usually I mix it up with a fork or even my fingers (finger-lickin' good) but I wasn't sure I was really in the mood to mess with it today. Still, the recipe called for 1 1/2 cups of brown sugar. Darn.

And then a big light bulb appeared over my head and lit up in all its glory. "Whoa!" I said. "What's that for?"

And a voice that sounded eerily like Emeril -- or maybe Martha Stewart -- said to me, "Don't you have a perfectly lovely KitchenAid stand mixer?"

"Uh . . . ye-eeees."

"Doesn't it have a perfectly useful wire whisk attachment?"

Blink-blink. "Yes, by golly, it does!"

"I rest my case."

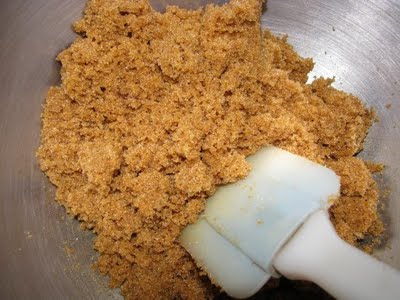
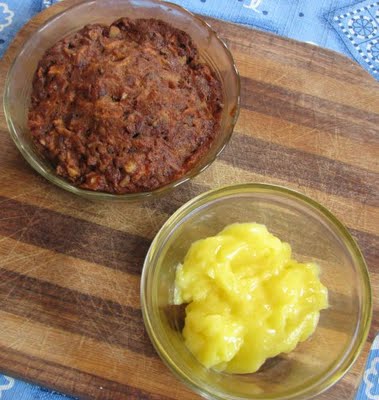
Well. The Voice doesn't have to speak to me twice. I dumped a couple of cups of granulated sugar into the bowl, added 4 tablespoons of molasses (because the recipe called for dark brown sugar) and let the Blue Beast loose at a sedate low speed. I scraped the sides of the bowl twice and BB did its thang and looky what we ended up with.

I don't think it took more than 5 minutes, including measuring time. And I still got to lick the whisk. The Blue Beast did all the work and I was able to use the free time to make a fresh pot of coffee. I don't see how one can ask for fairer than that, even on a bug day.


Friday, August 28, 2009

Rainy Day Fooling Around

This has not been a lovely summer day. No. This has been a day of mizzle and drizzle and featured the debut of a little baby stormlet, trying to impress Weather and hoping for a contract with the winter show. Baby pranced and performed, whooshing gusty wind rushes and tossing tree branches about. Didn't quite manage the patter of rain on the window pane but succeeded in getting the streets and highway wet enough to cause a satisfactory swish-swish from the cars going by. Don't know if Weather picked up Baby's option or not. Second string would be nice. Baby could learn from there.

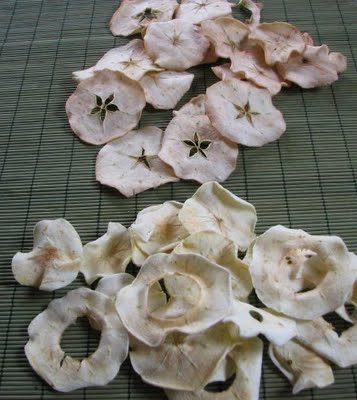
In any case, it was a good time to continue with the project I started last night, when I decided to dehydrate a couple of my Granny Smith apples. The first apple went in yesterday evening and the slices were ready 4 hours later. Schweet.


That would be the pile of apple rings in the foreground of the above photo. The ones with the round holes in them. First I hauled out my trusty v-slicer mandoline and zipped the apple through on the thinnest slice setting. Then I got my melon baller out and used it to cut away the core portions of the slices. Worked ever so neatly, as you can see. The holes were not that big before the slices went in the dryer but the apple shrinks as it dries so the holes enlarge.


That was before I went to a web site where a fellow by the name of Steve Gallagher did a terrific photo tutorial on drying apple rings. Steve said you don't have to core those puppies. Well, if Steve said so . . . What's more, he had rather more adventurous ideas about soaking the apple rings, far more interesting than simply dipping them in water treated with fruit fresh. Hah! I'm all over this, Steve!

So the Granny Smith I did today was soaked for 10 minutes in a mixture of cranberry juice and sweet Port wine, hence the faintly red tinge to the slices. I love the little cutouts formed by the seeds. Makes the slices look a bit like ruffly sand dollars.

All the slices, from yesterday's batch and today's, are still soft and pliable, rather like good suede. I don't want them dry crisp, just almost dry and chewy. And tasty. Oh yes, they be tasty!They pass with flying colors. Very toothsome, both batches. I will put them in plastic freezer bags when they've finished that final little bit of air drying. They would last a long time in either the refrigerator or the freezer but they won't have that chance. They make lovely snacking food here at the computer, you see.

Now I have to leave you becuth it ith not polite to talk wif my mouf full becuth it ith harder for you to undershand whudI'mshaying, you shee.

~~~~~~~~~~~~~~~~~~~~


Remember my mention of the split comment sections for the froyo post? And remember Bonnie and I only saw one of those sections the following day? Just on a hunch, I checked back a further page. Aha! The second section was there, right above the post for Shish Kabobbery. I was concerned because Diana asked a question and I wasn't sure if she'd been able to read the answer before it did its disappearing act. So, Diana! Here's what I found out for you:

Diana, what interesting questions those turned out to be! I just did a Google-gig to make sure I didn't lead you astray. (smile) Okay, Kraft Foods is the "culprit" for both items. Dream Whip and Cool Whip are both whipped cream substitutes, with Dream Whip being the powdered form to which you add milk and whip, whereas Cool Whip is already whipped. In the UK, Dream Topping seems to be Dream Whip's equivalent.

As for Miracle Whip, in any given group of people, you can almost guarantee a food fight by bringing it up. (grin) In the UK, I think Heinz Salad Cream is the equivalent. Do you have more than one brand of salad cream? Miracle Whip is like mayo with a tang -- it's like it's got more vinegar and sweet pickle spices in it.

Thursday, August 27, 2009

Playing With My Food

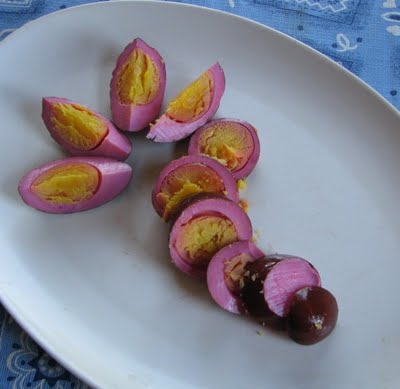
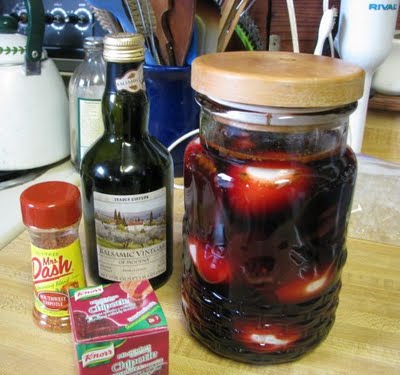
Okay. I've just become a staunch advocate for hot brine, as opposed to cold brine. Look how it's penetrated those eggs, actually starting into the yolks after only a week! The flavor, of course, goes right along with the color, because they are faithful companions.

Speaking of flavor, I was happy with this batch except for one teensy thing -- I wasn't nearly aggressive enough with the hot spices when I mixed the brine. Virtually no heat came through at all. Shucky-darn! Next batch, look out. I'm gonna load the brine with jalapenos and some African Bird and look for smoke to rise from the jar, by golly.

That dark burgundy on the outside is caused, I think, from the addition of the balsamic vinegar. I sort of messed up the yolks when I started hacking away at the eggs. But that's okay. Once I took the pictures, I chopped them all up and tossed them in a quickie 'tater salad for lunch.

Just a simple one . . . a Yukon Gold potato, nuked for 4 minutes and diced, skin on. Some minced onion. A couple of globs of mayo. Salt, pepper and Mrs. Dash chipotle seasoning. I seriously considered a strip of bacon crumbled into the mixture and that would have been lovely but I was too impatient to wait.

To tie up some loose ends, I should let you know that weird stuff was going on yesterday when I was uploading my post. The first attempt just disappeared from the planet, kapuft! Which irked me no end because I had to reload all those photos and redo all those links. Arrrgh! Then, today, I discover there is a comment section for both attempts even though only one of the versions got through. One is above the community service ad, the other is below. So if you're looking for your comment, it's either top or bottom. (sigh)

Update on the froyo -- I had the second half of my froyo effort for dessert today. David Lebovitz, who is THE ice cream guru, cautioned ice cream (or froyo) made this way -- without an ice cream maker -- was best eaten the same day it was made. I believe he's right. My froyo was frozen solid as the Ross Ice Shelf. Had to let it sit out awhile and then started hacking off spoonful after spoonful. It was still delicious but was much easier to eat yesterday. Lesson learned. Make small batches you can eat the same day. I can live with that.

In the meantime, playing with one's food is still fun . . . as long as you can eat it when you're done playing.

Wednesday, August 26, 2009

Froyo-yo-yo-yo

These past few days have not been idle. My inner Igor and I have been busily toiling in our kitchen laboratory, experimenting with different methods and recipes for froyo. Or is that fro-yo? I could be wrong but I think that's California-speak for frozen yogurt. Whatever the origin of the term, froyo is surely one of the wonders of civilization as we know it. It is not only lower in calories than its ice cream cousin, it's even healthy. Not to mention, it's heaven on a spoon.

I started with a great recipe from David Lebovitz. Granted, it is for ice cream but I think using yogurt instead of milk is a reasonable substitution. David promises his Easy Chocolate ice cream is ready to wolf down in a mere 4 hours without the need of an ice cream maker or any ice and rock salt rig. He was right. It's fantastic. And it's not his fault that I almost forgot myself and spat out the only mouthful I took. See, the recipe calls for one frozen banana -- and he probably meant a newer banana rather than an overripe beast ready for bread -- and 6 tablespoons of Bailey's Irish Cream. Now, I like bananas if they're not too ripe and Bailey's isn't bad, although I prefer Carolan's. Unfortunately, there is something about the combination that simply, emphatically does not work for me. I couldn't wash that batch down the sink drain fast enough. Gadzooks!

Igor scratched that one off the list (although a future attempt will include a newer 'nanner and either Kahlua or some other coffee/choccy liqueur), noting David also has a recipe for Strawberry Frozen Yogurt that looks yummy. Currently lacking strawberries -- or any other fresh or frozen fruit -- I have to pass on that one for the moment.

Okay. On to Heidi's wonderful 101 Cookbooks web site where she has a fabulous basic froyo recipe. It is so basic that I couldn't resist messing with it a bit. Still smarting from the Bailey's and banana FUBAR, I took her recipe and added 6 tablespoons of good ol' Peach Schnapps. That was yesterday. Today it is very cold and very tasty. It is also very -- uhmm -- loose. Just won't thicken up. Probably because I used all that schnapps and no banana. Alcohol doesn't freeze, you know.

So last night I decided to go ahead and make yogurt cheese which is, I understand, the same thing as Greek-style yogurt. If you can get the Greek yogurt, go for it. Otherwise, if you want the thicker yogurt, you have to drain your supply of regular. I notice everyone else calls that process "straining" the yogurt. I call it "draining" because I say to-may-to and they say to-mah-to. What we're doing is letting all the whey fall out, leaving a nice firm mass similar to cream cheese. And it's easy.

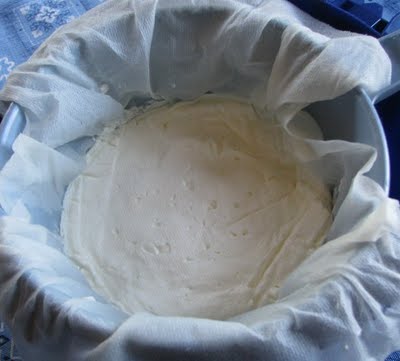
This is what went in my refrigerator at 10 pm last night and came out at 10 pm this morning. I should have taken pictures as I put my personal Rube Goldberg yogurt cheese maker together but by then I was in no mood for playing photographer. We'll just have to deconstruct the process so you can poke around your kitchen and come up with neat stuff to make your own unit.

What you basically need is a bowl and a colander that fits inside of it. You want enough space between the bottom of the colander and the bottom of the bowl that the yogurt isn't swimming it what it's trying to drain. Otherwise, you'll want to check and empty the bowl now and then. Once you have those two pieces, grab yourself a big paper towel -- or two of them if they're small. Get the towel wet, squeeze the excess moisture out, then spread it inside the colander. You can use cheesecloth or even a clean old pillowcase (better) but you'll have to scrape the cheese off the cloth and then you'll have to carefully rinse and wash it so it can be safely used again. With the paper towel, the cheese doesn't stick and you can toss the towel when you're through with it.

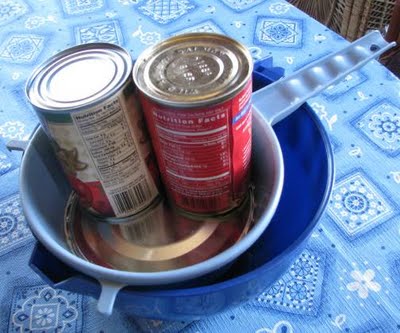
Dump your yogurt into the colander. I usually do the whole quart but I was down to roughly 2 cups of yogurt by last night. Neatly fold the paper towel over the yogurt so its surface is covered. Then take a dish or, as I did, the bottom of a coffee can, and lay it over the folded towel. Put the whole thing in the fridge and, very last thing, set two cans of whatever from your pantry on top of the dish/lid. I used one can of diced 'maters and one of salmon. You may file that under Trivia. The point is, that extra weight will squeeze out more whey at a faster rate. You don't have to do that part. In any case, the longer the yogurt sits and drains, the firmer it will get.

When you remove the cans and the lid and unfold the paper towel, you'll see a lovely firm cake of nicely thickened yogurt. Notice how there are practically zero bits of stray yogurt clinging to the towel? So neat and tidy. Just makes you wiggle with joy.

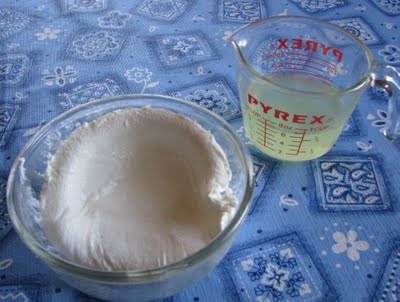
Okay. Carefully grasp the paper towel -- don't worry, it'll hold -- and flip the yogurt into your working bowl. Drained yogurt ends up with about half the mass it originally had. What I had here was about a cup of yogurt and 2/3 cup of whey. Don't throw out the whey. It's good in soups or as liquid in bread dough or all kinds of things. Some folks drink it. Or feed it to their critters.

Okay. Now we're ready for the Big Dance. Using Heidi's basic recipe from the above link, adjusted for the amount of yogurt I had, I added 1/4 cup of powdered sugar and 1/2 teaspoon of vanilla extract. Heidi used granulated sugar and said to stir until it was dissolved. The powdered sugar practically dissolves itself and its corn starch content helps with the thickening process. At this point you can add all kinds of wonderful things but I can only tell you I'm glad I took Heidi's advice and kept this batch at its simple basic minimum. (You can use artificial sweeteners, too, in whatever amount suits your taste.)

She used her ice cream maker to turn out her froyo from here. I just covered the bowl with plastic wrap and put it in the freezer.

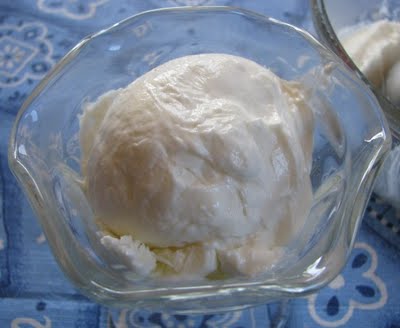
That was at 10:30 this morning. At 2:30 this afternoon, I scooped up this serving of froyo and sat down with my trusty spoon. OMG! Listen . . . this incredible delicacy is as smooth as liquid silk. There are only hints of ice crystals that dissolve almost instantly and, after all, provide the brain-freeze quality we want. The sugar softens the yogurt tang but doesn't hide it. What you experience is a very light, citrus-like flavor that makes you smile.

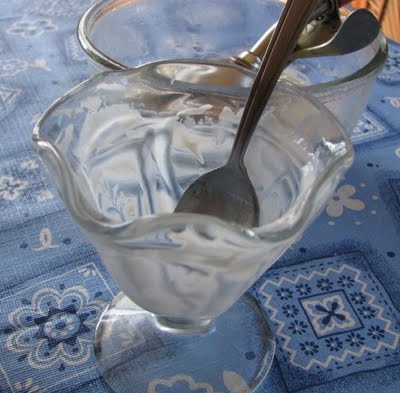
As you can see, all good things come to an end. But, oh my stars and garters, that was wicked good. The only problem is, I'll have to send my inner Igor to the market for more yogurt. And fruit. Because there are lots of froyo recipes with frozen fruit. That don't need an ice cream maker. That make you smile.

By the way, for those of you with food processors (you know who you are), here is what looks to be an excellent source of froyo variations at Cooks.com -- they use regular yogurt and still get almost instant serve. Wow.

Saturday, August 22, 2009

Shish Kabobbery

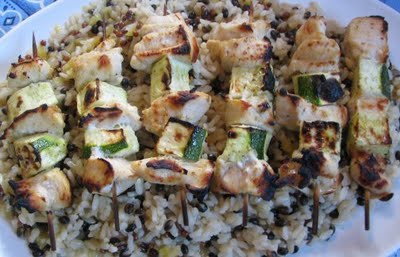
Some things are just too good not to share. The above photo shows you one of them. Shish kabobbed chicken that's been marinated in a yogurt mixture, skewered with chunks of zucchini, broiled and served with an apricot-enhanced rice medley. (Cue long, satisfied sigh signifying sybaritic satiation.)

This is all Drew's fault, of course. He had to show off the fantastic barbecued chicken he did with yogurt marinade and, well, one thing led to another and the next thing you know, there I am, puttering around with a similar effort.

First, of course, I fired up my trusty steed, Google, and typed in yogurt marinade. Woooo! There are easily 60-jakillion recipes out there, Coffee Mates. It turns out yogurt has been a gentle and highly effective marinade for practically ever. Who knew? What I ended up with is pretty much like this recipe, except that it's also a lot like a similar recipe, only the similar recipe called for a full 3/4 cup of lime juice, and then there was another recipe that called for cardamom as well as the paprika and cumin and I sort of mixed them all up in a hybrid concoction. Okay?

Will you be shocked to find I didn't add any hot spices? I was. Don't know how I came to forget that. But this is pretty much what I did . . .

Shish Kabob Chicken Stuff

Cut up skinless boneless chicken breast into bite-sized chunks.

Marinade:
3/4 cup lime juice
1 tablespoon olive oil
1/4 cup yogurt
2 teaspoons grated garlic
salt, pepper, cardamom, cumin, paprika -- about 1/2 teaspoon each


Mix together well, immerse chicken chunks, cover and refrigerate at least 1 hour or as long as overnight. (I did 4 hours.) Soak wooden skewers so they don't flare up in a blaze of glory and ruin your kabobs.

I didn't have any pineapple to skewer with the chicken but I had a zucchini that needed to be used. Chunked it up, drizzled olive oil over it, seasoned it with salt and some dry ranch dressing mix, tossed everything good so each chunk was well coated.

About half an hour before committing kabobbery, I started the rice. You can use any rice. I had some Trader Joe's Rice Medley, which is a combo of long grain brown rice, black barley and daikon radish seeds. I took 4 or 5 dried apricots and ran them through the chopper, pulsing until they were little bitty crumbs, then dropped them in the boiling water with the rice. Please trust me when I tell you that makes an excellent accent.

Okay. I started threading chicken chunks and zuke chunks alternately on the skewers, managing to avoid stabbing myself and actually coming out even on the number of skewers (six) that I had soaked. I couldn't pat myself on the back because I had marinade all over my hands but that's okay. By the way, that was from one chicken breast. Just so you know. There was plenty enough marinade for more than that.

Broiled those bad boys for 7 minutes on the first side and 5 minutes on the second side. If you do bigger chunks, your mileage may vary. And I don't have a clue about barbecue timing because I don't have a barbecue. How un-American of me.

The result? The word ecstasy comes to mind. Amazed delight is an accurate phrase. "Why didn't I know about this before now?" is an apt question. Because this chicken was so tender and SO juicy it was incredible. Remember, we're talking about breast meat, the cut folks most often complain is dry and bland. No blandness here, folks. The flavor was sublime, with just a whisper of the lime caressing my quivering taste buds. Not to put too pornographic a point on it.

Oh! Almost forgot to mention -- the zucchini was tasty and juicy, too. It turned out to be an excellent member of the team. Zukes can shish on my kabobs any old time.

Friday, August 21, 2009

I Like "Tough"

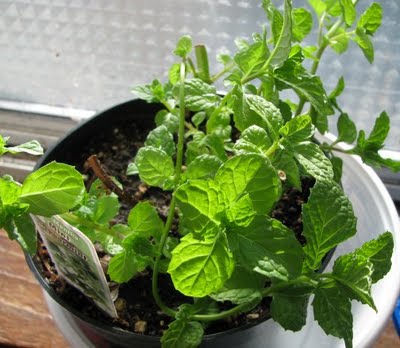
What you're looking at up there is one of my two spearmint plants. Fortunately for me, mint is an extremely hardy critter, tough to kill. This little guy and the one beside him, out of the frame, were very tall and bushy and full of dark green leaves that perfumed the air when you just brushed them gently. Gorgeous. And then they came to live with me -- and then I set them in the hallway, thinking the skylight would be great for them. I was wrong. They rapidly grew spindly and pale and began losing their leaves and I'm embarrassed to admit I didn't even notice for all too long. Bipped right past them, day after day, and never even looked. (sigh)

Well, when I realized I was in the process of committing involuntary mint slaughter, I whipped them back into the kitchen, pinched off all the spindly and dying stuff, watered them well and humbly begged them for forgiveness. I guess they're okay with that because they have begun to thrive again on the windowsill by the table. They're still not as dark green as they used to be but they've certainly improved over the sad state to which I'd reduced them. Provided I don't lapse into black thumb mode again, they'll progress beautifully.

I so admire their toughness that I decided they were an apt illustration for the batteries in my camera. I know -- that seems like a ludicrous leap of logic but stick with me here. I'll explain.

Back when I got my first digicam, the little refurbished Kodak, I was going through double AA batteries like they were popcorn. I think digicams were greedier then but maybe I'm wrong. I hate to think how many batteries I tossed before I found out they would still operate things like clocks and tape recorders even after the camera had sucked them down. By the time I got my beloved Nikon CoolPix, I'd graduated to rechargeable batteries and I ran two sets of Rayovacs for a couple of years without any problems. Along toward the last, I felt as though the batteries were not holding their charge as long but, by golly, they worked hard for the duration.

Then, when I got my current Canon Powershot (thank you, Cecil), I did a lot of research and ended up ordering a double set of Sanyo's Eneloops, along with the charger. That was in February of last year. The first set didn't run out until yesterday, a good year and a half after they were first popped into the camera! Mind you, that's with almost daily use for over a year. This past six months I haven't shot as many pictures but, still, I think the time span is pretty impressive.

Besides the fact that they're sturdy and long-lived (hence my mint analogy), these are what are called "precharged" batteries. They're ready to go right out of their bubble pack. So I've just recharged the first set and stored them away in their little container and fully expect them to be still amply charged when this second set runs down next year -- or whenever.

Wolfie, if I remember correctly, you were investing in -- I think -- Rayovac Hybrids at the same time. I think the hybrids are virtually the same as the Eneloops. What has been your experience with them? Just so folks know there are choices. Heck, by now there are probably even more precharged battery brands out there.

Just for the record, I'm not being paid by Sanyo to brag on their Eneloops -- but they wouldn't hurt my feelings if they sent me chocolate. Dark chocolate, please. Sanyo? Can you hear me now? Tap, tap. Darn. I don't think this thing is on.

Thursday, August 20, 2009

Egg-ception to the Freshness Rule

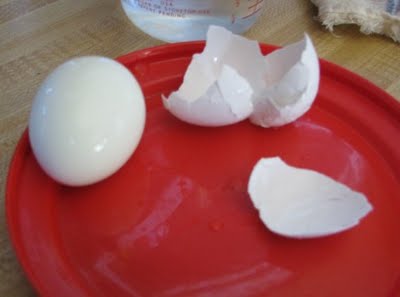
Okay, Coffee Mates, I want you to take a good look at the above photo. See that smooth and silky perfectly peeled egg? See the shell, lifted from said egg in almost one piece? It would have been one piece but I was so startled, I twitched a bit and tore the little section off.

There is nothing particularly earth-shaking about a smoothly peeled egg -- unless it happens to be a FRESH egg. Remember in yesterday's post how I mentioned a factoid I've always found to be true -- the shells of fresh eggs cling so tenaciously to the white that your hard boiled eggs end up looking like they've been chewed by starving hamsters. You always, always choose not-so-fresh eggs for hard boiling.

I think I may have been suffering under a misapprehension, at least in part. I still believe it to be true that fresh eggs, when boiled, are nearly impossible to peel neatly. But eggs that have been steamed to the hard cooked stage -- ahhhhh. That's a different yolk entirely.

Frankly, I had never heard of steaming eggs until I did some general research this morning, inspired by Drew after his comment on the last post. Thank you, Drew! It was while reading the comments of others who had faced the peeling problem that I came across the steaming tip. Further research showed it to be a not uncommon method for achieving hard "boiled" eggs and almost all the tipsters insisted it made peeling slick and easy even for fresh eggs!

Just for contrast, here's my tried and true method for boiling the (not so fresh) eggs. Put them all in a pan, single layer, and cover with cold water. Bring to a boil, turn off the heat, slap on a lid, and let the eggs sit for 20 minutes. Put the pan in the sink and run cold water in until all the hot water is gone and the eggs are cooling their round heels. (Note: some folks suggest putting salt or vinegar in the cooking water to prevent cracked shells. Salt makes the whites come out a bit rubbery. Don't know about the vinegar. I don't bother with either and rarely have a cracked shell.) Crack each egg against the side of the sink and, starting at the big end (where the air pocket is), peel the egg under running water.

Now here's what I did with the steam method: not willing to experiment with the whole dozen, I slipped one egg out of the carton and carefully slid it into a measuring cup full of water. Yup. Very fresh. The egg insisted on laying flat on its side, absolutely refusing to attempt any effort at rising. It languished. I suppose I should have taken a picture of it in that state but I'm sure you will believe me when I tell you it was definitely a fresh specimen.

Okay. As it happens, the shallow steamer pan for my pressure cooker fits quite nicely in my biggest saucepan. I put plenty of water in the pan (but not up to the bottom of the steam tray), brought it to a boil, turned the heat down to medium, put the egg in the steam tray and plopped the lid on. Set the timer for 20 minutes. (I read instructions for steaming anywhere from 12 minutes to 30 minutes. Since the egg came right from the refrigerator, I figured 20 was about right.) While the egg was steaming, I put the measuring cup of water in the freezer to chill. Some folks insist on bathing cooked eggs in ice water. I didn't have any ice handy. It didn't matter.

Once the 20 minutes was up, I transferred the egg, via tongs, to the cold water and let it sit for a couple of minutes. Had some sips of coffee. Crossed my fingers. Pulled the now-cool egg out of the water, cracked the shell good on the sink and held it under running water. Started the peeling process, expecting to work as delicately as I had to do yesterday with the slightly older eggs.

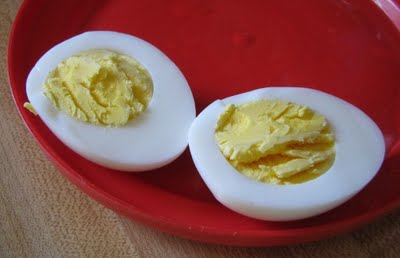
OMG!!!! The shell practically leaped off the egg! I could not believe it. And, yes, 20 minutes was quite sufficient to cook the yolk just right. (See photo below.) I'm lovin' me this steamer method, I'm tellin' ya! Now, I realize one measly little egg is not statistically significant so I can't really say steam cooking the eggs will always allow even fresh ones to peel smoothly. But, you know what? I'm certainly willing to do it again, just in the interests of scientific research. (Trying to assume a serious, Einsteinian expression.)
Oh! For what it's worth, here's another tip I ran across: To center the yolks for deviled eggs, sit the carton of eggs on its side in the refrigerator for 24 hours. I have no idea if this works or not but there is a vision in my mind's eye of the yolk lining up smartly like the bubble in a carpenter's level.

For information on the freshness test, you might enjoy the photos at the Recipe Hut. Also, the What's Cooking America site has lots of egg info. If you check in the left-hand side bar, clicking on the link for "Why do some eggs float?" will give you even more fresh-test info.

Well! I don't know about y'all but I've had an egg-ceptionally informative morning. And there's still time to look around for new worlds to conquer. Either that or imitate my fresh eggs and spend the afternoon languishing.

Wednesday, August 19, 2009

Pickled Plumb Pink

Oh, that's gorgeous, that is. And fast. And easy. And, if I have sufficiently sacrificed to the pickle gods, in about a week I will be enjoying the taste of those pickled eggs. And the beets. Just for the record, there are sliced beets in there, too.

Got this recipe from a fun web site owned by a nice fella named Drew Kime. He calls his place How to Cook Like Your Grandmother. This assumes one had (or has) grandmothers who were excellent cooks. (I'm raising my hand in the affirmative.) If you click on that link, you'll see photos of his pickled eggs after a mere week in the magic brine. There is also a link between the photos that will take you to the post with the recipe and several photos of the step-by-step he did last week.

His recipe is very simple: 1 cup each of vinegar, sugar and beet juice, heated until the sugar is dissolved and poured over 1 dozen hard boiled eggs, then stored in the refrigerator. Needless to say, I've tinkered with it just a teensy bit. I'll explain . . .

For one thing, he used plain beet juice but I had a can of pickled beets. The pickling liquid was already a bit sweet so I only added 1/4 cup of sugar to my broth. That seemed to be just right. I also played around a bit with the vinegar, using 2/3 cup of apple cider vinegar and 1/3 cup balsamic vinegar. Tasty!

Then there was the matter of heat. I do love the spicy stuff, you know. I put in one of the Knorr brand mini-cubes which is supposed to equal one chipotle pepper. Just to top it off, I also gave a healthy sprinkle of Mrs. Dash chipotle seasoning. Took a sip. Oh yes. Very fine. Most excellento.

The eggs. Went to the market today and picked up 2 dozen eggs, figuring on using one dozen for this project. Now, you know -- you KNOW -- you never ever want to use really fresh eggs for hard boiling. Not if you want to peel them smooth and unmarred. So I loaded a dozen of the little beasties in the pan and poured the cold water over them. Oh shucky-darn. They all lay flat on the bottom like they were glued there. Totally fresh. Not even a hint of age.

I grumbled a bit and returned the eggs to their carton and pulled out the next dozen. They didn't seem to be all that much older but at least they stood up on their pointy ends and some of them even made token efforts to levitate just a bit. Okay. I probably should have waited at least a couple of days but I wanted to do this pickling thing TODAY. (Please, Lord, grant me patience and do it right now!)

It worked out pretty good. Only two out of the twelve ended up with chunky gouges in their hides. I'll just eat them first. In fact, those will be the ones I eat before the week is up and the fact that they're not perfectly smooth will keep me from feeling guilty about jumping the gun. I'll just claim to be tidying up the neighborhood.

What I'm anxious about is penetration. I've done pickled eggs before, once or twice, and the color didn't go in very far. I notice Drew's eggs absorbed the color (therefore the flavor) right up to the yolks. In cruising around reading through assorted recipes, the consensus seems to favor pouring hot pickling brine over the eggs to achieve maximum penetration. Makes sense to me but an awful lot of the recipes call for cold brine. We'll see. This time next week, I'll slice one of those bad boys open and then we'll know. Will the pink penetrate partly or will it penetrate profusely?

Oy, the suspense! The thrill of it! Reminds me of the old Saturday matinee cliff-hangers. Maybe I'd better check the popcorn supply.

Thursday, August 13, 2009

Definition of Exciting

Well, it's getting close to time for the annual September visit from brother Merle and SIL Linda. He and I were talking on the old fashioned telephone (insert smile) the other day and he said I should be thinking about something exciting for us to do when they get here. "Okay," I said. "I'll be thinking on it."

So I thunk and thunk and, by golly, just this afternoon it came to me. Trumpets tootled and lights flashed and bells rang and I think there was even a bit of ahoogah horn in there. Which is to say, my idea is absolutely smashing and has the potential for extreme excitement.

I am going to introduce them to the mighty Tim Tam Slam!

Now, you've heard me rattle on about Tim Tams before. You know I believe Tim Tams are possibly the greatest export Australia has ever -- uhmm -- exported. I saw them referred to on one web site as "a chocolate religion" and that's not far wrong. All by themselves they're good enough to make angels sing and shout. But when they're used in that magical Australian rite called the Tim Tam Slam -- well, that's when they become positively orgasmic.

I am not making this up.

It's not always easy to find a stateside source of Tim Tams and even when you do, they don't always have the particular flavor in stock that you want. I, for instance, adore the dark choccy version but my supplier is out at the moment. I was able to score a couple of the originals and a couple of the double-choccy versions, though. They should go out in the mail tomorrow, which means they'll arrive here in plenty of time.

It's a bit worrisome, though. They're coming from Texas. This is summertime. It is HOT. I sure hope they're not all melted together when they arrive. Not that such an event would prevent me from enjoying their Down Under deliciousness. It's just that it's a lot easier to suck a hot beverage through a single bikkie than a clump of them, don'cha know?

Dear Family, if you are reading this and you find yourself questioning my definition of exciting, I refer you to the embedded YouTube video at the bottom of this post. There are lots of videos of people demonstrating the Tim Tam Slam but this one is my absolute favorite, featuring Graham Norton and Natalie Imbruglia. When you see Graham's reaction, you'll understand why.

There's just one thing -- at the very end of the video Natalie says something that I just KNOW is funny and -- judging from Graham's reaction -- probably risque but I'll be darned if I can figure out what it is. I have played that darned video over and over and the line remains a mystery. Coffee Mates, can you help me out, here? Do any of you understand what she says? If you can solve that puzzle for me, I would be so -- so -- excited.


Saturday, August 1, 2009

Take One Apple . . .

Yeppers, that's all it takes -- just one apple to make two of those little mini-cakes. You don't even have to peel the apple if you don't want to (I didn't.) but you do need to grate it up. Or you could use some of that zucchini that seems to be everywhere this time of year -- or a couple of carrots or whatever. Just so you get about a cup of juicy grated stuff. I found the recipe on the Taste of Home web site but I've messed with it a bit so I'll show you what I did here and you can click on the link to see what the author of the original recipe did, okay?

Before we get to the recipe, I need to mention something about eggs. I never did buy into the booga-booga stuff about cholesterol and eggs. Sure, they have cholesterol but, as was pointed out in Prevention magazine way back in the '70s, they also have plenty of lecithin, which emulsifies the cholesterol and fat. Also, the eggs have more of the good cholesterol than the bad . . . and dietary cholesterol is no longer considered such a culprit anyway. Here's a pretty good short article on the subject. I mention this to explain why I added the yolk to the lemon sauce even though it wasn't mentioned in the original recipe. That said, everybody's body works different so you have to march to your drummer, not mine.

Okay, here we go with the little cutie-pie apple cakes with lemon sauce. The batter will be divided up between a couple of small ramekins -- I used two 12-ounce Pyrex dishes that worked fine. I think one could probably even make about 4 cupcakes with this amount of batter.

MINI-APPLE CAKES

2 tablespoons shortening or butter, softened
1/2 cup sugar
1 egg white
1/2 teaspoon vanilla
1/2 cup flour
1/2 teaspoon baking soda
1/2 teaspoon salt
1/2 teaspoon cinnamon
1/4 teaspoon nutmeg
1 cup shredded apple
1/4 cup chopped pecans

Mix fat and sugar together until crumbly. Add egg white and vanilla and mix well. Add dry ingredients and mix well again. Batter will be very stiff. Fold in apple and nuts. The moisture in the shredded apple will loosen up the batter a little. Spoon into greased 8- or 10-ounce baking containers. Bake at 325 degrees fairy height for 30 minutes.

If you compare pictures, you see my cake came out a darker brown than the other one. I think that's because I baked mine in the countertop roasting oven and it took twice as long because there is no way the little oven can maintain the kind of heat you get in the big one. No problem. The cakes were just right when I took them out. Nice and moist and nummy. And here's the lemon sauce, which takes only a couple or three minutes in the microwave:

QUICKIE LEMON SAUCE

3 tablespoons sugar
1 tablespoon corn starch
1/4 cup lemon juice
1 egg yolk
1 1/2 tablespoons butter, cold, cubed


Mix sugar, corn starch and lemon juice together and microwave on high for 1 minute. Whisk, then add a couple spoonfuls of the lemon mixture to the egg yolk and whisk it in to temper the egg. Then whisk the egg mixture back into the lemon mixture and microwave for another minute. Add the little cubes of cold butter and whisk until the butter is melted. If the sauce looks thick enough then, you're done. If not, another minute won't hurt.

In the photo above, you can see the sauce got thicker as it cooled. When I get ready to eat that cake, I'll slip the sauce in the microwave for maybe 30 seconds to make it a bit easier to pour over the cake. Nom, nom, nom!

And it only took one apple . . .